Paint Your First Mini

You can paint your own miniature. It might sound daunting, but it is not as hard as it sounds. In this article, we cover the tools and techniques you need to get your mini ready for the tabletop.
We are going to be ruthlessly practical. We are not going to cover shading or layering or dry-brushing or any of the more advanced techniques. Instead, we’re going to stick to a simple base coat and a wash. We will also show how to do spell effects with a single coat of ink.
Plan for about 3 hours of work and a budget of $30-50 (though you can definitely spend more if you want)
Painting is like playing a musical instrument. There is always more to learn, and there are always people better than you. But once you’ve grasped a few basics, it can be enjoyable and rewarding.
Supplies
Here are the basics of what you’ll need, along with the rough prices:
- A plastic mini (two is better, since you can practice on one). $5.
- A set of acrylic paints. $16-50 (depending on the set).
- A paint brush of size 1 or 0. $4
- A palette. $0-15.
Below, we talk about each of these in detail.
You’ll also want good lighting, a disposable cup of water, and a paper towel.
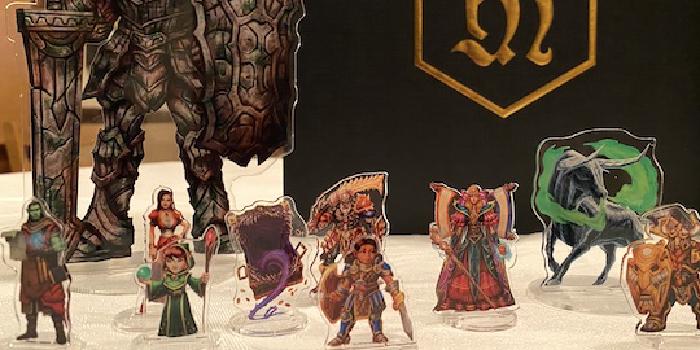
Supplies 1: Finding a Mini
If you’re interested in creating a veritable army, it probably doesn’t matter what miniatures you start with. But if you’re in it to create that special tabletop character, choosing a mini is an important step.
We strongly recommend starting with a plastic miniature. Metal and resin are each unforgiving in their own ways. With plastic minis, there is almost nothing you can do to them that can’t be fixed with paint, glue, or a good washing with soapy water.
We recommend two different brands of miniatures for starting out.
- WizKids has several lines of miniatures, including an officially licenses Dungeons & Dragons line.
- Reaper has some gorgeous fantasy miniatures in their “Bones” and “Bones Black” lines.
WizKids Minis
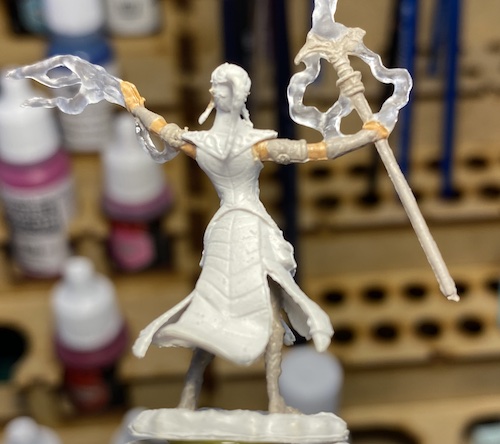
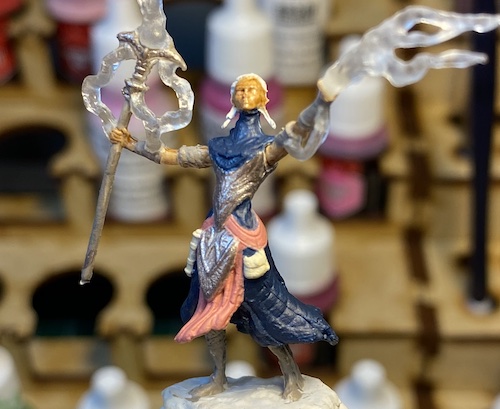
These miniatures typically ship in two-packs with two black disk bases. They come pre-primed. Scale-wise, they are realistic, which has both positives and negatives. For example, the eyes on these miniatures are often so tiny that it does not make sense to try to paint them. In our experience, WizKids miniatures frequently have “mold lines” – thin lines of plastic left over from the mold in which the plastic was injected. Optionally, you can trim this off with a hobby knife or file it with a small file. In the miniature that we show here, we didn’t bother.
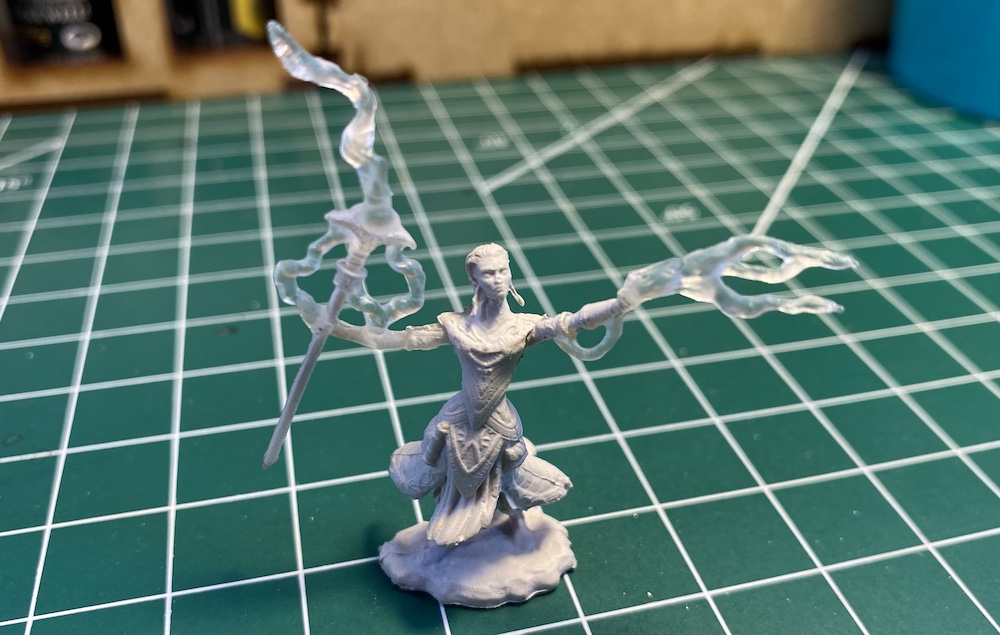
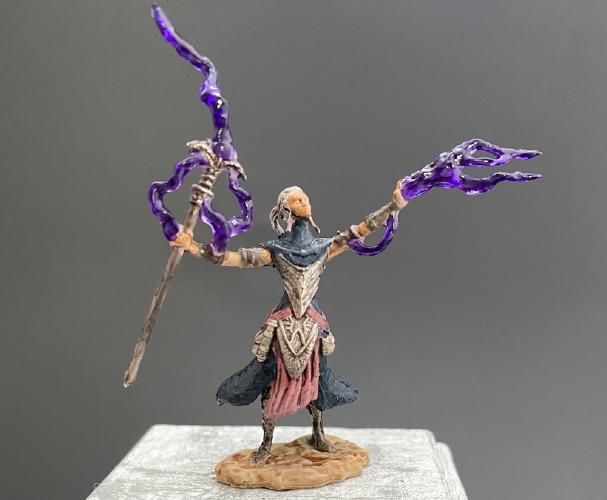
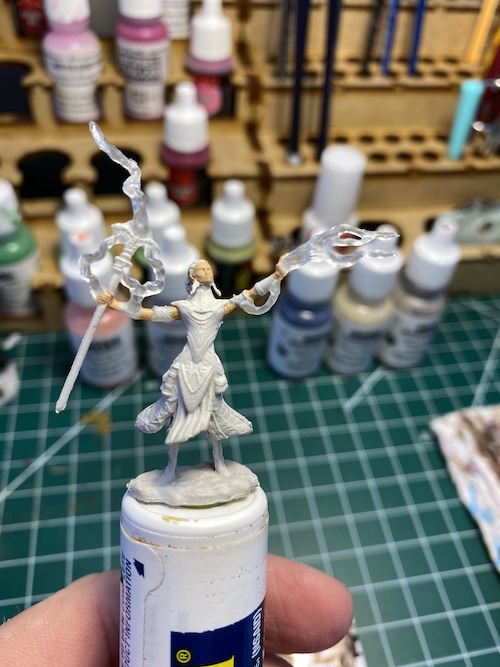
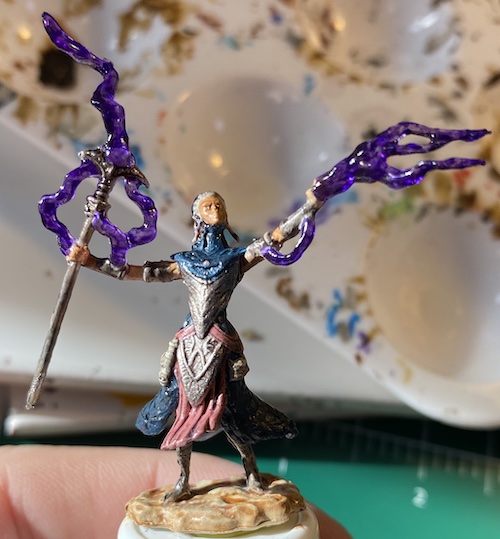
The one we are painting today is a WizKids “D&D Elf Wizard” mini.
Reaper Minis
Reaper miniatures are harder to find in stores, but we sure like them. They ship in individual packs. Scale-wise, they are the same “gaming” scale as WizKids, but the sculptors at Reaper tend to exaggerate some features (like eyes and hands). We very much like this about Reaper miniatures, but largely it is a matter of taste.
If you choose a Reaper miniature there are two things to keep in mind:
- They are unprimed. We suggest either using Reaper’s paint or priming the miniature.
- Reaper also sells metal minis. We recommend not starting with metal.
Supplies 2: Choosing Paints
Typically, minis are painted with acrylic paint. We have tried a variety of paints, ranging from generic craft paint to high-end acrylic artist’s paint to paint specifically formulated for minis.
Our advice: Buy a starter set designed for mini painting. Don’t bother with craft paint. It is cheap and will chip or peel off.
All of the main mini-painting brands are good. There are minor differences in viscosity, pigmentation, and such… but honestly the most important thing is finding a paint you can easily get. We recommend checking with your local gaming or hobby store.
Here are three starter sets that we think are fabulous options:
- Reaper’s Starter Paint Set: 13 colors, two of which are metallic. $40.
- Army Painter’s Nolzur’s Marvelous Pigments Adventurer’s Paint Set: 9 paints, one of which is metallic, primer, a mini, and a brush. ~$30.
- Vellejo themed sets, like Protectors of Virtue or Champions of the Realm: 8 paints, two of which are washes and one of which is metallic. $17.
The Vallejo sets are color-coordinated palettes. The paints are pre-selected to look good together. The Reaper and Army Painter sets are well-rounded paint colors.
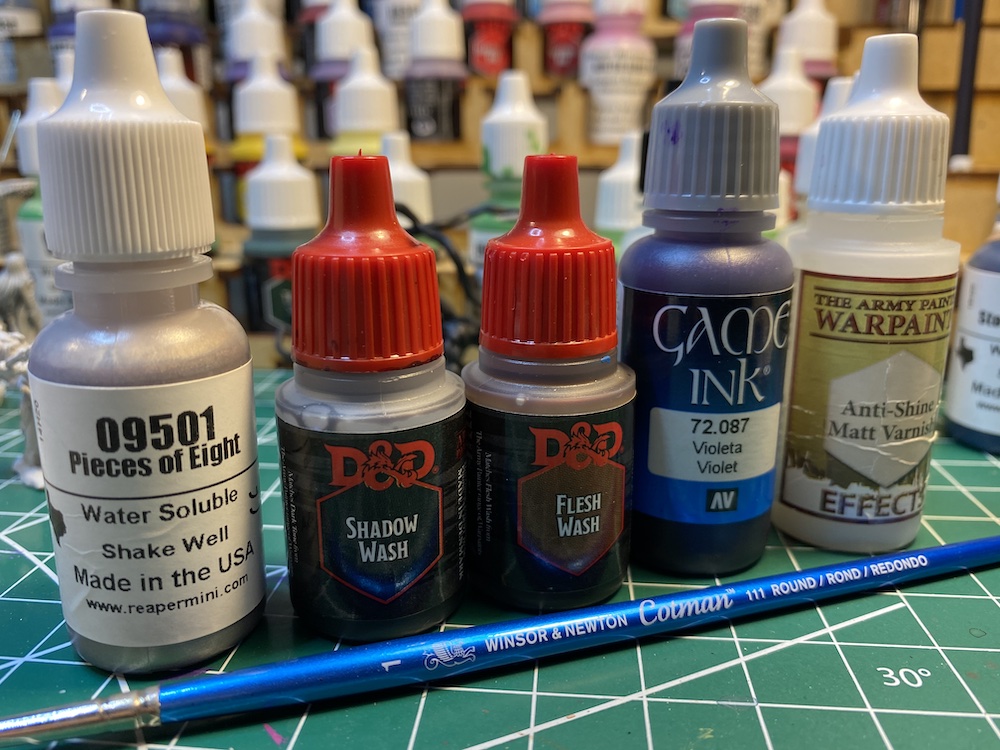
If you get the Reaper set or the Army Painter set, you probably also want a Black Wash and Flesh Wash, which we’ll use below.
Washes are sometimes jokingly called “liquid talent” because they achieve such a stunning visual result. You definitely want at least a black wash (“shadow wash”).
We use a few things that are entirely optional:
- A Vallejo ink for painting clear “spell effect” portions of the mini.
- Army Painter Matte Varnish and Gloss Varnish. (Vallejo and Reaper varnishes are just as good.)
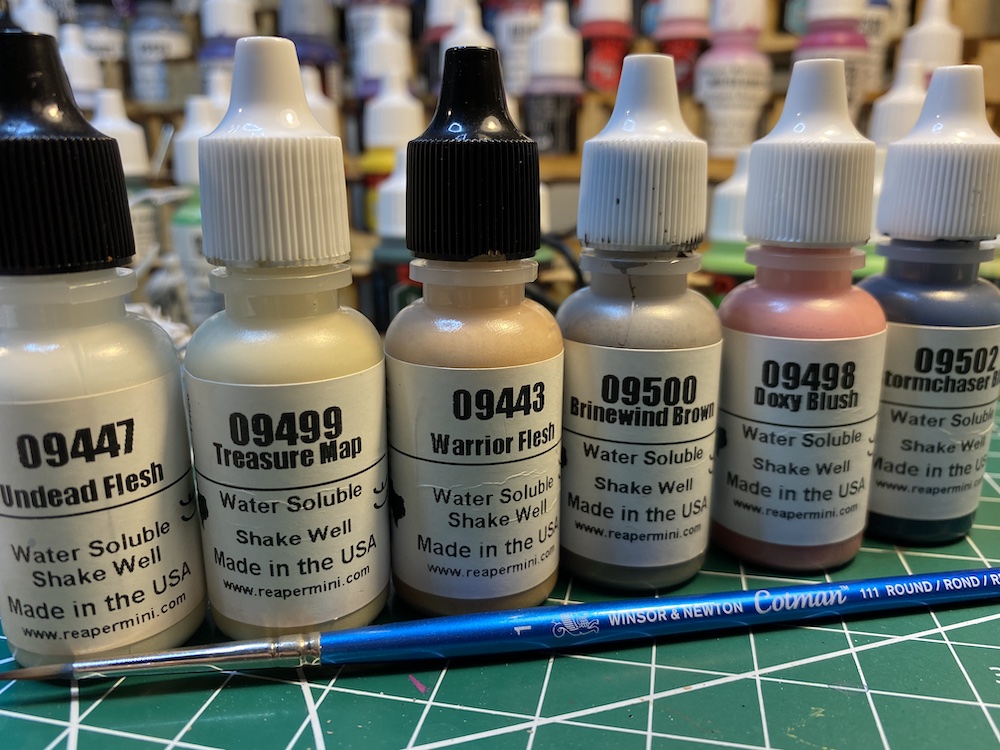
For reference, these are the paints we are using. You’ll notice that we mix brands with reckless abandon.
Supplies 3: Brushes and a Palette
Brushes are the most subjective element in your painting collection. While super cheap brushes tend to fail quickly, for the most part you can be productive with brushes whether they are cheap or expensive. The most important thing is the size and shape of the brush.
For starting, we recommend a mid-tier synthetic watercolor brush. Synthetic bristles are a little stiffer and a lot cheaper. We are using only one brush: A size 1 round Windsor and Newton Cotman watercolor brush. It is quite hard to do the detail work with a size 1, so we would recommend also getting a size 00 round Windsor & Newton Cotman watercolor brush. These brushes run about $4.00 each.
But don’t stress it. You can head to your local craft or hobby store and pick up brushes there. The key is to get a round brush sized between 1 and 000 (3/0)
You will need a palette on which to put your paint. A cheap plastic one from the art store is fine. So is a ceramic tile. In a pinch, you can use baking parchment or wax paper.
Elsewhere, you may read that you need a wet palette. This is not necessary. We don’t recommend investing in one unless you really get into painting.
Preparing the Mini
Before painting, there are a few minor steps to do.
- If the mini has any hanging bits of plastic from the mold, cut them off with a hobby knife.
- Rinse the mini in warm water and then dry it thoroughly.
- If your mini came unprimed, you should prime it (or use Reaper MSP paint). All WizKids minis come pre-primed.
When you are painting the mini, you can hold it by the base and paint it. But it is easier to use a painting handle. You can buy one, or you can do what we did here and just stick it to some random handle-like thing. We used an old plastic pill container and stuck the mini to it with a drop of hot glue.
Whether you make or buy, painting handles are nice because they keep your hands off the mini. And if your hands are shaky, the grip makes it easier to brace your hand.
Straighten Out a Bent Mini
Did your mini’s weapon or staff get bent in the package? It’s easy to fix.
- Pour boiling water into a mug
- Fill a second mug with ice water
- Using tongs, lower the mini into the hot water for 5 seconds or so
- Again using tongs, pull the mini out of the hot water and carefully drop it in the cold water for 10 seconds
- Dry thoroughly before painting
When the mini warms in the hot water (step 3), the bent items should straighten themselves out. If not, you can gently straighten them between steps 3 and 4.
The Painting Process
We are going to paint our mini in a few stages:
- Apply the base coat (90+ minutes)
- Apply washes (5 minutes)
- Do some highlights (20 minutes)
- Color the spell effects (optional, 5 minutes)
- Paint the base (15 minutes)
- Varnish (optional, 5 minutes)
When you get more advanced, steps one and two become several steps… or maybe several dozen, as you apply layer after layer. But the great thing about painting minis is that we can get a good looking result with just the steps above.
Below, we will spend a long time on step 1, painting each section of the mini. The remaining steps go much faster.
Step 1: The Base Coat
The base coat is the paint layer that has the main hue. In contrast to base coats, you have shade layers (darker) and highlights (brighter). We are going to paint the base coats for all of the colors on the mini.
We will “paint the mini in the order you get dressed”:
- Skin
- Lowest layers (pants, tunic)
- Outer layers (cloak, weapons)
- Accessories (pouches, belts)
- Hair
An Unscientific Note on Thinning paints
Keep your brush damp as you paint. This means periodically swirling it in a cup of water. After swirling, dab the brush on a paper towel to get rid of the extra water. This helps the paint flow off of the brush.
With Army Painter and Vallejo paints, the paint is slightly too thick when used straight from the bottle. Usually, if you dip your brush in your water and then swirl it in the paint, the water thins the paint to about the right milky consistency.
With Reaper paint, as long as your brush is damp the paint should be the right consistency. But you can definitely thin it if you want.
With that detail out of the way, let’s paint!
Skin
We’ll start off by painting the skin. Do not stress about the skin tone. Just pick a color that feels right and go with it. Don’t let the labels on the bottles confuse you, either. Just because it doesn’t say “skin” or “flesh” doesn’t mean you can’t use it for skin. And since this is fantasy, you can even pick reds, blues, purples, greens… whatever.
Shake your paint bottle well (10-30 seconds), remove the cap, and blot a 1-2cm dot onto the palette. Dip your brush in water, touch it to a towel, then dip just the tip of the brush into the paint.
When painting minis, the key is to load a very small amount of paint onto your brush. (One technique is to dip the tip of the brush into the paint and then drag it a few centimeters, unloading some of the paint as you go.) Then apply small amounts of paint in short brush strokes. Don’t push on the brush. Just gently glide the brush tip along the surface of the mini. It is normal to do at least two coats of paint.
For our mini, we wanted a bronze tone for this elf druid. We wanted the autumn fey feel to it. So we started with the Reaper color “Warrior Flesh”.
There are a few strategies for giving flesh a livelier feel:
- Just use one color and let the room’s light cast shadows for you
- Use two paints, and layer a lighter flesh tone over a darker flesh tone
- Use a flesh wash over the paint
The third one will give you the best results in the least amount of time. It’s a nice tradeoff between the first, which looks okay and is easy, and the second, which is considerably harder.
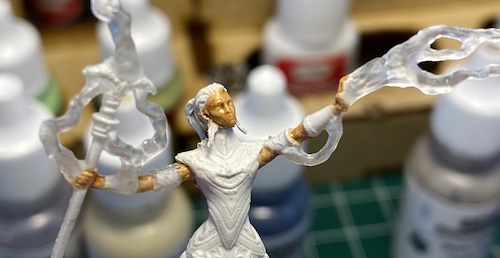
After a few minutes of letting the paint dry, we’ll apply a little bit of flesh wash to all of the skin areas. Flesh wash is tinted rusty red, so it will definitely change the tone of the skin a bit. It pools in deeper recesses (like eyes and ears), which gives an immediate sense of depth. The flesh wash is glossy, but when we varnish the mini at the end, it will remove the gloss.
With the skin done, we can go to the next layer.
Pants and Bracers
For pants, we’re going to do a grey brown called “Brinewind Brown.” This mini’s pants are partially underneath her armor and tabard. This means we will have to manipulate the brush into some hard-to-reach spots. There are three things to keep in mind when trying to paint hard-to-reach areas:
- Don’t shove the brush. You’ll just ruin it.
- If you can barely see a space when you’re holding the mini up close, nobody else can see it when you’re playing on the tabletop. So don’t worry about it.
- Be sloppy. You can paint over the mistakes later.
And we’re serious about 3. With those first few paint areas, it’s better to over-paint a little bit. Get paint in all those little folds and recesses. If a little gets on tabard, no big deal! We’ll be painting that part again later. The important thing is to not leave gaps. When you go back with other colors and paint with more detail, you don’t want little white lines where two paint colors meet.
Along with the pants, we decided to do the bracers (wrist guards) in brown as well. This gives them sort of a dull metal feel, as if they were tarnished. While things look flat right now, later we’ll add depth with a wash.
Finally, we painted the staff brown. Later, we are going to add some metallic finishes to it.
Tunic, Tabard, and Robes
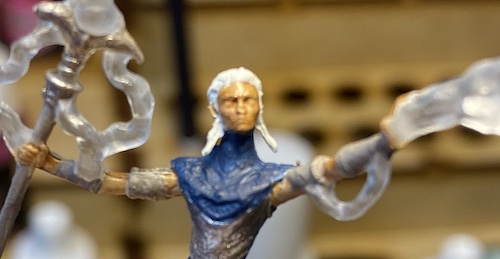
We’re now moving our way outward. We will paint the tabard blue.
Different paint colors have different consistency and opacity. With this particular blue (Stormchaser Blue), we painted three coats to hit the desired level of opacity. Paint pigments are like this. Some colors cover in one coat. Others take three or four. This is just a fact of chemistry. (Please don’t be the one who leaves the one-star review on Amazon because the green paint didn’t cover in one coat!)
We decided to also do the collar in blue. And while there was some ambiguity as to where the collar could end, we decided to bring it up nice and high like a turtleneck.
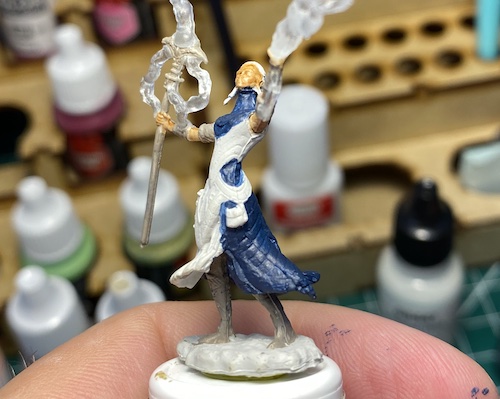
Next, it’s time to add a splash of color. We’ll paint the cloth in the front with a deep pink. Blues and pinks tend to go well together, and this lively color offsets the deep blue to bring some energy to our wizard.
We are going to add some more pink later. But that will be when we hit the “accessory” stage. Right now, we need to do the armor.
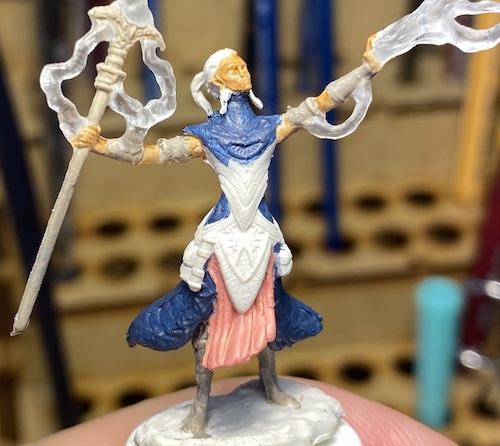
Armor and Staff
We love the Reaper metallic color “Pieces of Eight.” It’s somewhere between tarnished brass and pewter. So we did the entire breastplate with this metallic color. Then we added a metallic layer on the headpiece of the staff.
There are a few things to keep in mind when painting metallics:
- The paint dries faster (because of the binder agent, I am told)
- The metal feel comes from small pieces of mica in the paint. It’s like painting with very fine glitter in glue.
- Because of these two things, wash your brush out after painting metallics.
We normally do the metallic painting in two stages: Big items (swords shields, etc) during this stage. Then, at the highlighting phase we do belt buckles, arrow tips, and snaps.
However, we don’t have any tiny metallic details on this mini. So the metallics will be done in just one go.
Accessories
Now we’ll go back and start doing the small things. The pouches will be “Treasure Map” white. The belt will be “Doxy Blush”. At this point, painting slowly and carefully is important.
During this phase, it is also an opportunity to go back and clean up any mistakes you made earlier.
Hair
The last part of our base coat will be the hair.
We’re shooting for black hair with white highlights. To achieve this effect, we paint the white and then later wash it with black wash. But we don’t want the white to be pure white… we want just a hint of green in there. This will balance nicely with the copper-toned skin. We used the “Undead Flesh” tone that one might normally use for zombie skin.
At this point, we’re done with the base coat. Every bit of the mini should now be coated in paint. Next up, we’re going to add some depth.
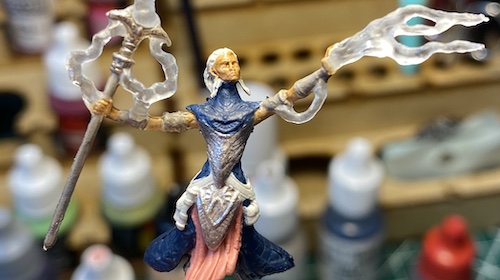
Apply Wash
This is the single most rewarding phase of painting. At once, we’ll hid a bunch of mistakes, add depth of color, and add some visual distinction between areas.
Applying a black or brown wash will alter the brightness of your colors. If you are using a wash, make sure your paints have a lot of contrast. The Doxy Blush pink might look obnoxious when you first paint it, but the wash will mute it.
A wash is a paint that has been formulated so that the pigments sink into the recesses of the mini. This gives depth, of course. It also lines the edges of things. For example, the bracers will stand out against the skin.
Applying wash is a little bit like painting with water colors. Your goal is to work the wash into all those little lines and ridges. Use slightly longer strokes. Sometimes you will have to coax it into recesses. Other times you will need to wipe excess wash off of smooth surfaces. Paint sections separately. Paint the pants. Then the armor. Then the bracers. Try to avoid getting the black wash on the skin tones. Otherwise, she’ll look like she’s in dire need of a bath.

When we put the wash on the pouches, the texture of the fabric comes out. With the armor, we see the lines between plates. On the staff, the scrollwork of the headpiece is suddenly the focal point. And with the hair, we have taken it from white to black hair with white highlights.
Add Highlights
Let the wash dry. While it tends to dry out within a minute or two, sometimes it pools. I suggest giving it ten minutes or so. Then you can begin with the highlights.
Highlighting is a subtle art. But there is an easy way to get started: Go back to your original colors, and add a few details. Because the wash darkened the hues, adding a dot or stroke of the original color will increase the brightness of the area again.
If your miniature has belt buckles, snaps, buttons, arrow heads, dagger hilts and the like, you might pull those metallic paints back out and do some highlights.
Because our figure has spell effects, we’ll take a slight detour before finishing up the mini’s base.
Inks and Spell Effects
Some of the Wizkids miniatures have “spell effects” – clear plastic portions sculpted as lightning bolts, fire, acid, water, and the like.
You can, of course, just paint over these areas with your regular acrylic paint. It works fine, and many professional painters do this.
If you want to keep the element of transparency, then instead of using regular acrylic paint, you can use inks.
Vallejo and Reaper both make excellent inks. Here, I am using a Vallejo ink to color the lightning arcs.
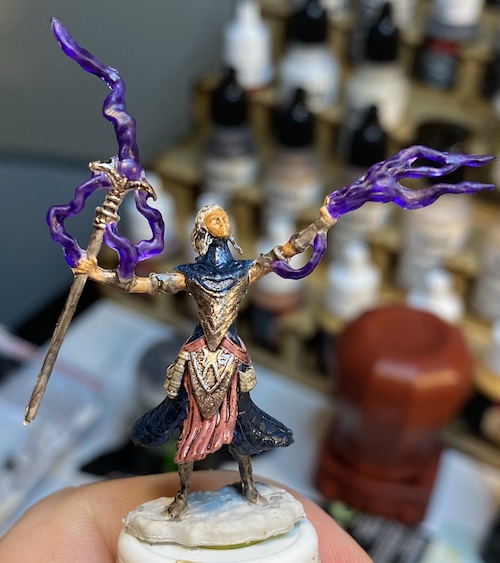
Use inks like washes: Brush the ink on with long strokes. If you like, let it pool in the recesses to add depth. Try to stick to one coat of ink if possible. Too much ink gives a muddy appearance.
If you are trying to use multiple tones of ink, do one color, let it fully dry, and then do the next color. This is a slower process than working with paints.
Painting the Base
If you are planning on using your mini on the tabletop, our feeling is that the base is largely utilitarian. Don’t go to great lengths to decorate it or “re-base” the mini. Just paint it and then give it a wash.
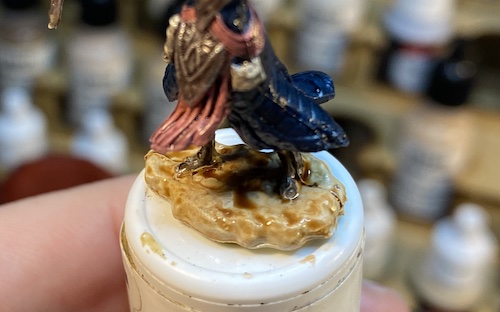
For this mini, we wanted the base to look like a red sandstone. So we painted it with “Treasure Map” and then applied a flesh wash on top. The flesh wash effectively tinted the base coat into an almost rust orange.
Varnish (Clear-coat)
Wait 24 hours before doing this step. The paint needs to fully cure.
Painting the mini with a matte varnish protects the paint that you just spent precious hours applying. It also evens out the sheen of your paints. You may have noticed that some of the paints are naturally shinier than others. The flesh wash in particular is quite glossy. Applying a matte varnish evens things out.
You can almost paint the clear coat with reckless abandoned. Make sure you don’t get any blobs or pools. But otherwise your only goal is to cover every exposed edge of the mini. (You needn’t worry about the deep recesses under cloaks and behind shields.)
Once the varnish is applied, let the mini stand for a few hours. While the varnish will be dry to touch within moments, it takes time to thoroughly set.
To make the spell effects stand out, we used a gloss varnish on just the inked area.
That’s it! At this point, you now have a painted mini to bring to your next D&D session. To get it detached from the holder, run a craft knife around the glued area, then gently apply some pressure. The mini should pop right off.
If you enjoyed painting, there is certainly much more to learn. Dry-brushing is the next skill to learn, followed immediately by layering (which will completely transform your process). And once you’ve mastered those, there are all kinds of techniques and tricks to master.
But if none of that appeals to you, you still now possess the skills (and paints) necessary to paint your own minis in this same quick and usable way.